Pages

Wednesday 31 October 2012

Ghosts, Ghouls and Spooky Things

It's All Hallows Eve and the wee little ghosts, goblins and ghouls come out to play. The history of Halloween is quite interesting and nothing like the commercial version you see nowadays. It dates back to the Celtic traditional festival of Samhain. This was a pagan event to celebrate the end of the harvest and prepare for the winter. October 31 was believed to be an overlap of the two worlds of the living and the dead in which the dead for that evening would roam amongst the living. Of course dead people coming back to life love to wreak havoc and such... especially on your crops. To blend in with the spirits, people would dress up like ghosts, ghouls and other spooky things and thus they would not be targeted for mischief and wrong-doings. 

The story of the Jack-o-Lantern is even more confusing. There are many different versions of it, but they all boil down to a crafty man named Jack who outwits the devil. He then releases the devil but only with conditions that his soul will not go to hell when he dies. The devil complies but when Jack dies he finds out that since he wasn't so good he also can't go to heaven. This put him in a bit of a pickle. He was forced to wander the earth. As he could not see where he where he was going the devil gave him an ember from hell that would never extinguish. Jack carved a lantern out of a turnip and put the ember in it and wandered endlessly. He became known as Jack of the lantern. 

All this history of ghosts, ghouls and other unmentionable things of course I decided to join them today with my Carmen Sandiego outfit. This of course is the perfect outfit to outwit those zombies. They wouldn't even know where in the world she was? He he he. 

Truthfully my outfit evolved last week sometime when I found a great Carmen hat at Winners.  With a red coat at home, yellow scarf and some black outfits to wear underneath, I was set. I wore this costume once already on the weekend for a party with friends and then again for work today. For the rest of the people at my office I planned a costume contest as well as a cubicle decorating contest and my co-worker made some Halloween trivia. 

For prizes I made some nice little felt items. The prize for the trivia was a wise little felt owl ornament to decorate an office. Inspired by this idea here. For the costume contest I created a little pumpkin. I used the idea of cutting little circles and folding them like you would for a felt carnation but instead I made it round. To do this I glued them all to a button in the middle. Then I added a little felt roll of a stem and a green leaf. It turned out pretty cute! Lastly, for the cubicle decoration winners I made some cute little felt ghost ornaments like these ones here. Hopefully everyone likes their gifts. 

 
I also made some cards to give to friends and family on this day. I was very pleased with how they turned out since this is my first batch of cards ever. (A friend of mine just recently taught me how to do it and now I am addicted.)

 
The evening will probably entail handing out candy at a friends house, drinking wine and watching Halloween movies on the TV. Ahh... such a great day!  

Where in the World is Carmen Sandiego?

There she is!

Felt Ghosts for a Prize 

Felt Owl for a Prize

Felt Pumpkin Prize
 

Tuesday 30 October 2012

Pumpkin Pie Oatmeal

Today, feeling in the fall spirit, I decided to make some Pumpkin Pie Oatmeal for Breakfast. Warm and delicious, this was certainly a hit with my stomach! Thank you to my sister for the recipe. (I am unsure if she found it or invented it)

Pumpkin Pie Oatmeal
1/2 cup of Quaker plain quick oats
1 tsp brown sugar (or to taste)
1-2 TBSP pumpkin puree (or to taste)
1 tsp cinnamon
1 tsp nutmeg
1/2 tsp allspice
hot water
milk (optional)

Put all ingredients in a bowl. Add hot water to desired runny-ness and stir. After oats have sat for a minute of two, add a dribble of milk if you wish to top it off. Enjoy!

Monday 29 October 2012

Baby Shower

Two weeks ago I hosted a baby shower for the lady I made the blanket for. Showers are always fun and it gives me a chance to try out new decorations and recipe's. I decided to decorate with large crysanthemum poof's in yellow white and orange. Please see here for a tutorial since I didn't record mine. (Tissue Flowers Tutorial) I made some huge ones and some small ones to give some variety to the look. Also instead of hanging streamers like normal, I twisted them like I saw on this post. (Garland Tutorial) I really liked how it turned out!

For snacks we had Salsa and Guacamole with chips. I have posted my Salsa recipe in another post on my blog (Salsa Recipe) but I will post the guacamole down below. Also we had tea, coffee and cakes. I made some delicious coconut cakes with a coconut cream cheese ganache mousse cake topping. Yum yum! (I was using up leftover bits of icing from the last week) On top of the cakes were little orange fondant flowers. The rest of the guests brought potluck items so I didn't need to provide as much.
We hade a few games too for the day. One of them you had to guess the number of baby items in the bag. The mother to be got to keep all of the items after. Can you believe there are 41 items in that bag below??

Overall I think it went quite well and the mother was happy!

Here are some recipe's for your Monday enjoyment:

Guacamole Recipe
2-3 Ripe (preferably organic) Avocado's
1 tsp Sriracha Rooster Sauce or another hot sauce
2-3 TBSP plain yogurt
Salt to taste
Cut avocado's and scoop green flesh out from inside. Mush with a fork in a bowl till creamy. (I sometimes use my food processor to speed things up) Add other ingredients. Salt to taste. Enjoy!

Coconut Cream Cheese Ganache Mousse Cake Topping
1 cup of your favorite cream cheese frosting
1.5 cups or so of whipped Ganache (please see my previous post) (Ganache Recipe)
1/4 cup coconut cream
1.5 cups heavy cream
Blend cream cheese frosting, coconut cream and ganache in a bowl. In a seperate clean bowl, whip the cream. Slowly fold about 1 cup of whipped cream into the chocolate mixture. When it is incorporated, fold in the remainder. Ice cake accordingly.
Setting up the table

Cakes- These were on a cake stand later on

Guessing game- How many pieces do you think are in here?

Lei with blue pacifiers for the mother-to-be to wear

Poofs and ribbons


Quilted Pinwheel Baby Blanket

One of the ladies in my class is having a baby soon so I decided this time instead of crocheting a baby blanket since that takes such a long time, I would quilt it. Also I haven't had a chance to quilt in a while and I love doing so. 

To start off you will need some different fat quarters of cotton in various colours as well as white. For this blanket I had 7 patterns that match, white and then a few metres if plain light green for the backing and small details. 

Since I do not have a quilter's mat and rolling cutter I do it the old fashioned way by cutting a template out of a thinner cardboard. Usually if you have an old cereal box kicking around it will work nicely. Corrugated board I find is sometimes too thick to get the same precision. Be very neat and precise with your measurements and make sure you use a ruler to get straight lines. 

I cut out three different pieces. The triangle piece measures 14cmx 14cm (5.5"x 5.5") This piece was for the main parts of my pinwheels. I wanted 2 different coloured patterns for each pin wheel with the while in between. So to do this I cut 48 white triangles and 48 coloured ones (8 triangles each of 6 different patterns).

The second piece I cut out was a rectangle that was 7 cm (2 3/4") by 22 cm (8 3/4") These you will need 17 pieces of. I originally cut them out in white like in the picture but then I found this was too stark against the pinwheels so I went back and cut them out of a coloured fabric. 

The last piece I made was a square that was 7cm by 7cm (2 3/4" x 2 3/4") I cut 6 of these pieces out of the same fabric I used for my backing. 

Materials
7 cotton colours in fat quarters
White (maybe about 1m will be plenty for everything you need
Quilting batting about 36"x48" (I like the one made of bamboo, but there are many blends)
cotton fabric in the colour you choose to back the blanket about 36" x 48"

Tips
Keep 1 cm seam allowance throughout, always
Press every-time between steps
Be precise

Process
Step 1: Cut cardboard templates out. Then trace them with a pencil on the WRONG side of the fabric. Make sure you are very precise about this. Cut out the pieces very carefully. Keep the triangles in pairs of two. 

Step 2: Match up two different patterned pairs with 4 white triangles. This will be the basis of your pinwheel. 

Step 3: Stitch each coloured triangle to a white one. Put RIGHT sides together and stitch along the hypotenuse of the triangle. When done iron/press them flat and make sure the seam is pressed behind the darker colour. Cut the "dog ears" off of the square.

Step 4: Now you should have 4 squares for each pinwheel. Arrange them so that the colours are alternating with the white. Like colours should be across from each other. (see pictures) Stitch 2 squares together. Repeat with the last two squares. 

Step 5: Press the seams again then stitch the two rectangles together to form your first pinwheel. Press. Repeat steps 2-5 for the remaining 11 pinwheels. 

Step 6: Arrange your pinwheels in the pattern that you like the best. It should have 3 across by 4 down. Then in between each row of 3 pinwheels, stitch a rectangle bar. (Eg. It will go pinwheel, bar, pinwheel, bar, pinwheel) do this for all 4 rows. 

Step 7: With your remaining rectangles stitch them to the squares in this pattern: bar, square, bar, square, bar. Press flat.

Step 8: Attach each of the three skinny bar strips to the pinwheel rectangles that you already have. One set of pinwheels will not have a strip on it. 

Step 9: Sew two strips together then sew the other two together. Then join together to form your completed quilt topper. The reason you do it bit by bit like this is so that if there are little mistakes in alignment they can be absorbed into the pattern easier. If you started at one end instead you would have a huge difference in measurement once you reached the other end of the quilt. This is especially noticeable on adult size blankets. 

Step 10: Press your quilt topper. Then sew it to some quilt batting. Cut off excess batting around edges after. (I usually leave about an inch around the edge of batting) Place this on top of your backing fabric. Measure and cut around so it is the same size. Stitch it together. Use leftover scraps to create a bit of a bias tape that you sew around edges to clean them up. My strips were about 7.5 cm (3") wide so that I had enough to have about 2.5 cm (1") on each side and then the remaining inch was tucked under on each side. 

Step 11 FINISHING: If you have a quilters or embroidery foot, this is where you can quilt all the layers together in a free flow pattern of your choice. These "feet" block the feed dogs so that the fabric can be moved all around. If you do not have one of these (like me) then there are a few options:
1. You can either stitch in the groove between fabrics. 
2. You can make a straight pattern back and forth over quilt.
3. You can join the layers together with tufts of embroidery thread or yarn every few squares.  Thread the yarn/thread through all layers of the quilt and tie ends on the top half. 
The reason you do this is that it joins all the layers besides just on the edge. This makes it a lot easier to wash. 


Cut out pattern templates

Trace pattern on WRONG side of fabric

Match colours in groups of 2

Completed triangles

Match each coloured triangle with a while one and stitch (Right sides together)

Press flat with seam towards darker colour

Remove dog ears

Stitch 2 squares and 2 squares together

Join the two rectangles together. Match the centre seams first!

Press pinwheel flat. Trim edges a bit if they are uneven.

Layout pinwheels with bars in between. Start stitching them in rows together.

Join remaining bars with squares, press and sew between pinwheel bars. I changed my bars to a colour afterwards since I didn't like the white bars. 

Completed layout. Press. Attach quilt top to batting and backing. 

Sew strips around edges to finish off blanket. 
Finished Blanket


Wednesday 3 October 2012

Ganache it up

Today has been a busy day. I have a client coming over tonight for a cake tasting so I have been whipping up a flurry of wonderful delectables! We had Coconut Almond cake, Chocolate Cherry cake,  Red Velvet cake and Sour Cream Orange Zest cake. Then for icings I had both coconut and raspberry buttercream, chocolate ganache, plain cream cheese icing, almond cream cheese and coconut almond cream cheese. Whew! Just finished. I must say they all turned out pretty fabulous! 

So a little something for your wednesday hump day:

Chocolate Ganache Recipe
1 cup heavy cream (I use the old fashioned dairyland whipping cream but regular kind works as well)
9 squares (9 oz or 9 x 28 grams) of semi sweet chocolate 
  (I usually do about 5 squares semi sweet and 4 unsweetened since I feel it tastes better)
1 tsp rum, brandy or amaretto (or another liquor of your choice) (optional)

Chop up the chocolate in small pieces and put in a bowl. Heat the cream in a saucepan till it is nearly boiling. DON'T let it get to a boil. Stir the whole time so it doesn't burn. Pour hot cream over chocolate and whisk till silky smooth. Add liquor if you want. Ganache can be used right now as a runny icing to pour over a cake, cupcake dip or any other desert. If you let the ganache cool then you can whip it in the mixmaster until it is lighter and fluffy like a frosting. Now it can be spread or piped on a cake or cupcakes. 

Truffles
Cool the leftovers of your whipped ganache in the fridge. When it is more solid take small amounts and roll in balls. Dip in cocoa. You now have truffles to snack on. Work fast as your hands will start melting the ganache. You might have to make them in a few batches and keep some in the fridge while you are working. Store truffles in fridge until ready to eat. 

Tuesday 2 October 2012

Survival of the Fittest... or the most prepared

So my man's birthday was Saturday. I wanted to post this before since I was getting so excited about the present I got him but of course that could spoil the surprise. 

Trev and I are both really into camping and being in nature. As well we believe that you can never be too prepared. He loves survival gear and techniques. So keeping with that theme I decided to make a bit of a disaster/camping kit of things he might not have yet. (He has quite a few things) 

First of all a week or so ago I was at Mountain Equipment Co-op (MEC) and found a nifty little camping stove that folds down super flat and is great for backpacking off the beaten trail. I loved it and actually bought one for myself. The stove is super light and only about 100 grams and less than a cm thick. I got it since neither him or I currently has a small little stove I had been looking for one anyway. I will still probably go out and get one of the propane or gas ones, but this is a good one when we don't want to carry that fuel. 

Because of it's portability and lack of fuel this stove is a perfect stove for survival in the wilderness. Promptly after I purchased one for myself I went back to the store and picked up one for him as well. 

I was really tempted by the Platypus water filtration system but it's a wee bit out of my price range for now. http://cascadedesigns.com/platypus/filtration-and-storage/gravityworks-filter/product I am sure that one of us will get it eventually though. I have heard great things about it and it filters so fast!

The second thing I found for him was a survival booklet that it very detailed in everything you need to know about survival. It has info about different climates, their vegetation and animals. What you can eat and what you should avoid. Different trapping, hunting, shelter, fire procedures, etc. The best part of it is that it has very clear and concise pictures for all of these and the plant pictures are all in colour. Together with the book and the stove I picked him up a new flint/magnesium strip for fire starting. 

On Pinterest there have been a few neat camping/survival things floating around so I decided to try a few of those out. Firstly there is a good method for fire starters. Apparently you can take cotton balls or swabs and douse them with petroleum jelly and you have instant fire starters that last a few minutes. Now normally in the past I have always used the dryer lint in the egg carton method with paraffin on top but these are so much easier to produce that I decided to whip some up for him to use. 

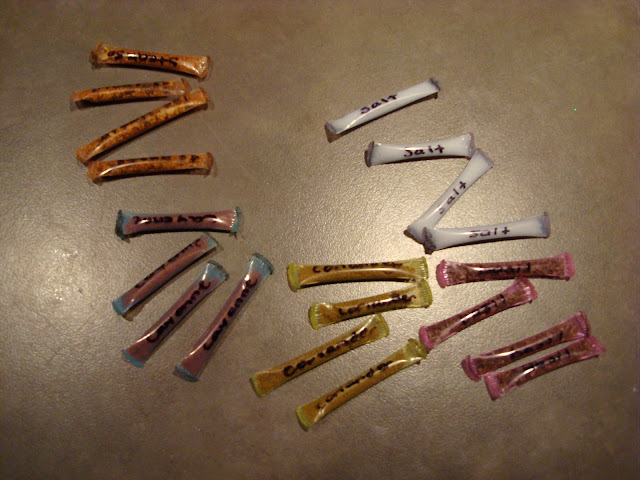
The second thing I made was the spices and first aid ointments in straws. You take the straw and cut it in pieces. Then with each piece you take needle nose pliers to the end of it to hold it steady, hold the tip over a flame or candle, then pinch the melted plastic with the pliers so it seals the end. After this you fill the little tube with spices or ointments for first aid. You then seal the other end of the straw the same way. 

I know these are not the most environmentally friendly method, but they certainly cut down the weight in your bag for various containers and allow you to have single portion packages without spending the big bucks buying them. I especially liked them to make little Polysporin and peroxide packets since the store bought individual packages are expensive and even more wasteful with their packaging. They are also really convenient for the spices since then you are only packing a tsp or two for your meal. Afterwards I labelled them all with a permanent marker. Also I tried to keep each item in a different colour of tube so that if the names wear off, they still appear different. 

Lastly I made portable toothpaste blobs. Take a sheet of saran or tin foil, etc. and put a bunch of blobs of toothpaste on it. Let it dry for 2-4 days. When done, remove them from the sheet and put them in a Ziploc with a bit of cornstarch or baking soda so they don't stick together. When camping and it is time to brush, you take one of these out, chew it a bit to moisten and then start brushing. It is really good for backpacking since it reduces the load in your bag. This would be good for airplane travel too since you only need to bring a blob or two on the plane instead of getting the special tube under 100ml. 

Packets of spices

Completed gift satchels

Stove and book

Lemon vanilla bean cupcakes with lemon buttercream for the party
After all of that I packaged it in a nice little box as shown above. I think all said and done it turned out quite well. 

Cards and Painting

Last weekend a friend of mine came over and taught me how to make cards in exchange for a basic painting class. I had a blast. She taught me all about the different types of ink, medias and things you can do with cards. I think this could possibly become a very dangerous hobby for me. (Like I need another hobby) So after a bit of instruction I made a few cards for Christmas. 

After she left I decided to make a few more cards for Halloween but found out I was a bit limited since I didn't have all the same fancy tools she did. I will say however though if you have a good ruler and you are precise, that you can make due without a card cutter if need be. Also I didn't have a stamp cleaning pad like she did so I improvised. 

I took a piece of rag from my scrap bin that was sweatshirt material. I chose this one because it has a bit of fuzzy to it. I cut it in half and put one of the pieces on a small plate. This one was my wet cloth so I dampened it with water. The second piece was my dry cloth. I must say that these both worked out pretty good and cleaned up my stamps pretty sparkly new. 

All and all I had a blast and thank her for her wonderful instruction.